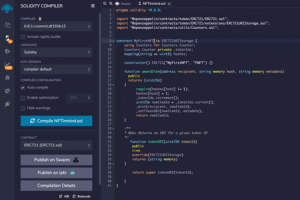
Remix will compile the NFT smart contract before deploying it.
In order to do this, you have two options: If you mark the Auto compile option in Remix, every time you save the file, your smart contract will be compiled. Or you can uncheck this option and compile it manually.
Let’s see in more detail:
- Compile smart contract.
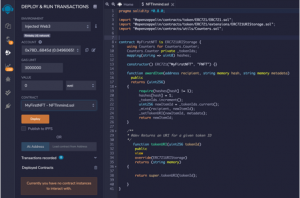
- Deploying smart contract in Rinkerby Test Network. In order to do this:
a. We are going to move to the DEPLOY and RUN TRANSACTIONS screen in Remix.
b. Select the Injected Web3 environment, which will display a Metamask pop-up in order that you allow the connection. Be sure that you are in the Rinkerby Test Network and you have some ETH available to deploy and mint.
c. Select the smart contract that you are going to deploy, in our case is MyFirstNFT – NFTInmind.sol
d. Click on deploy and wait until your transaction is confirmed.
e. If all goes OK, our NFT smart contract is deployed in the test network and it is available to be minted with all the NFT that we want. In order to mint new NFTs inside this smart contract, you will need to provide different Metadata and Hash parameters. It won’t be possible that you mint twice the same NFT.
Using Pinata (IPFS) to add information to your NFT
We have our NFT Smart Contact deployed in the Rinkerby Test Network and it’s almost time to mint it but before we need to use an IPFS provider to store the data related to the NFT (title, description, link, etc). In this tutorial, we are going to use Pinata as an IPFS provider.
a. We need to choose the image or gif of our NFT and we are going to upload it to Pinata. In our case, we are going to use the Inmind logo.
 b. In your browser, open https://pinata.cloud/ and create a new account.
c. Upload your image or gif and save the IPFS CID. You are going to use it later.
d. Now it’s time to define the JSON metadata so that we can pass it through to our token contract. In order to display all the data in OpenSea, you will need to follow a metadata template (https://docs.opensea.io/docs/metadata-standards).
{
“description”: “Our first NFT.”,
“external_url”: “https://www.google.com”,
“image”: “https://gateway.pinata.cloud/ipfs/ QmRkX4qFogkz7kMp4bgkQ1njPYBr3DbAo98P7UWtTWfaBx”,
“name”: “Inmind NFT”,
“attributes”: []
}
It’s crucial that in the image field you use this https://gateway.pinata.cloud/ipfs/ and concatenate the IPFS CID which is displayed in Pinata.
e. After having the JSON metadata file, we need to upload it to Pinata too and store the IPFS CID which will be used when minting our NFT.
Minting NFT using Remix and IPFS data
Summarizing until now we have:
- NFT smart contract compiled and deployed to Rinkerby Test Network.
- Json metadata and Image stored in Pinata.
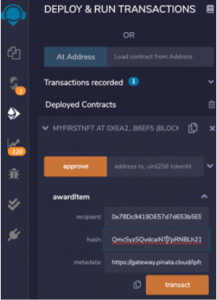
It’s time to mint our NFT. In order to do this, we are going to use Remix in order to execute the awardItem function that we defined in our smart contract. Find the awardItem function, populate the parameters and click in transact.
If all goes OK, you mint your first NFT.
This function takes three parameters which were described before: Ethereum address where the NFT will be transferred, Metatadata (Json metadata Pinata URL), Hash (Json IPFS CID).
In my case, I will pass these values:
- recipient: 0x78Dc9419DE57d7d653b5E9c59DaC249F2a66845d (my Rinkerby test network address)
- hash: QmcSyzSQvdcaiNT7pRNBLh21yV3zM697g15Q5ezPWwQwRc (the IPFS CID of you Json file)
- Metadata: https://gateway.pinata.cloud/ipfs/ QmcSyzSQvdcaiNT7pRNBLh21yV3zM697g15Q5ezPWwQwRc (Pinata URL + Json IPFS CID)
–
In Remix, it should look like this:
In order to validate if your NFT has been minted correctly, you can use the tokenURI function that we defined in our smart contract and if it returns the metadata URL, we are ok and ready to view it in OpenSea.
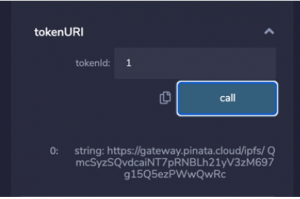
Please note that you have minted only one NFT so, the tokenId should be 1 in order to retrieve the URI.
In case you mint more than one NFT, you are going to change the tokenId parameter to see the URI associated.
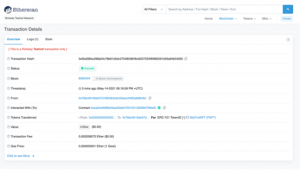
Another check that we need to do, using Etherscan, is checking that the NFT smart contract was created and minted successfully.
You should see a transaction like this one:
View the minted NFT in Opensea
The last step in order to check that the minting was right is to view our NFT in Opensea using the test platform that they provide.
- In your brower navigate to https://testnets.opensea.io/
- Connect Opensea with Metamask (be sure that you still in Rinkerby Test Network)
- Go to your Opensea dashboard and open the Activity tab.
- You will see the NFT that you have just minted with all the metadata associated.
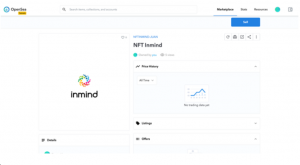
If you see the NFT in OpenSea with all his data, you have created a NFT from the scratch in Rinkerby Test Network.
Congratulations!
In case you are thinking about any project or app related to NFT, Cryptos or any Blockchain app, please contact us at https://inmindsoftware.com and we are going to be glad to help you with your idea.
Until next time.
 Co-Founder & CEO @ Inmind - Blockchain & Mobile Expert | DAO / Tokenization / Web3 | CTO @ Brainstems (Former TIEX) | Board Member @ CUTI