
Adding ETH to your Metamask wallet
In order to get funds to make the transactions that we are going to need to deploy and mint the NFT.
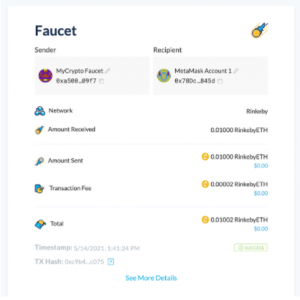
We are going to use Facuet website, which is going to send us small ETH amounts to our wallet.
We have a lot of Facucet websites options. For this tutorial we are going to use: https://app.mycrypto.com/faucet
In order to do this, you are going to select the Metamask account that you created previously and you are going to repeat this process many times in order to get a considerable amount of ETH.
These are the steps to follow:
- Connect the faucet website to your Metamask account.

- After viewing the transfer confirmation check your Metamask account and you are going to see that you have ETH in your Rinkerby Test Network available to use.
Now that we have our Metamask account and ETH on it, we are ready to proceed with the creation of the NFT smart contract.
Install and use OpenZepellin templates
The OpenZeppelin team provides us with a set of templates which helps the developers to write good contracts.
For this tutorial, we are going to use the ERC-721 contract template.
- In your terminal, you need to create a new project.
mkdir myFirstNFT && cd myFirstNFT
- We are going to initialize our project using NPM.
npm init -y
- Now, we need to install the OpenZepellin library which contains all the smart contracts templates.
npm install @openzeppelin/contracts
- We create the NFT smart contract as an empty file.
touch NFTInmind.sol
After this, our next step is to write the NFT smart contract using the OpenZepellin template.
Write NFT smart contract using REMIX
In order to write and deploy our NFT smart contract, we are going to use REMIX which is a Ethereum IDE which allow us to interact with the Blockchain which you selected in Metamask.
In our case, it will be Rinkerby Test Network.
- In your browser and navigate to https://remix.ethereum.org/
- Using Remix, open NFTInmind.sol file which was created previously.
- We will proceed to write our first NFT smart contract.
First of all, we are going to define the Solidity version that we are going to use, in our case, it will be 0.8.0 because the OpenZepellin contracts use this version:
pragma solidity ^0.8.0;
Then, we are going to import the OpenZepellin contracts in order to have them available to use in our NFT smart contract:
import “@openzeppelin/contracts/token/ERC721/ERC721.sol”;
import “@openzeppelin/contracts/token/ERC721/ERC721URIStorage.sol”;
import “@openzeppelin/contracts/utils/Counters.sol”
Resuming the previous process:
- After importing the OpenZepellin contracts, we will need to define our smart contract and his constructor:
contract MyFirstNFT is ERC721URIStorage{
constructor() public ERC721(“MyFirstNFT”, “FNFT”) {}
}
Above we defined MyFirstNFT smart contract which inherits from ERC721URIStorage which is the OpenZepelling smart contract that we need to use as a base.
In the construct method, we define the name of our NFT and its symbol, you can choose the name and symbol that you want.
- We need to define some variables that we are going to use inside our smart contract. We are using Counters to help us increment the identifiers for the tokens we mint. We are also creating a _tokenIds variable to keep track of all of the tokens we’ve issued.
And finally, for our top-level variables, we’re creating a mapping for the IPFS hashes associated with tokens. This will help prevent issuing tokens mapped to a hash previously associated with another token:
using Counters for Counters.Counter;
Counters.Counter private _tokenIds;
mapping(string => uint8) hashes;
- Until now, your smart contract should look like this:
pragma solidity ^0.8.0;
import “@openzeppelin/contracts/token/ERC721/ERC721.sol”;
import “@openzeppelin/contracts/token/ERC721/ERC721URIStorage.sol”;
import “@openzeppelin/contracts/utils/Counters.sol”;
contract MyFirstNFT is ERC721URIStorage {
using Counters for Counters.Counter;
Counters.Counter private _tokenIds;
mapping(string => uint8) hashes;
constructor() public ERC721(“MyFirstNFT “, “ FNFT“) {}
}
- We need to add a method to our contract that will allow us to mint an NFT for a specific IPFS hash if no token has been minted yet for that hash.
We’ll do this just below our constructor:
function awardItem(address recipient, string memory hash, string memory metadata)
public
returns (uint256)
{
require(hashes[hash] != 1);
hashes[hash] = 1;
_tokenIds.increment();
uint256 newItemId = _tokenIds.current();
_mint(recipient, newItemId); _setTokenURI(newItemId, metadata);
return newItemId;
}
Our awardItem function has three parameters: An address variable called recipient, a string variable called hash, and a string variable called metadata.
The address variable is the person’s wallet address who will receive the NFT.
The string variable for the hash is the IPFS hash associated with the content we are creating the NFT for.
The string variable for metadatas should refer to a link to the JSON metadata for the asset.
The metadata might include the asset name, a link to an image referencing the asset, or anything else you want.
Inside the function, we are checking that the IPFS hash doesn’t match a previously minted NFT, if all is OK, it increments the tokenId for the new NFT and it will mint it in the Ethereum wallet address that was provided as a parameter.
- Our last step before compiling, deploying and minting our NFT is to define a tokenURI function which will receive a tokenId and will return the associated URI. We are going to use this function in order to automatically display in Opensea the IPFS data associated to the NFT in Pandora.
We will cover this in another article.
function tokenURI(uint256 tokenId)
public
view
override(ERC721URIStorage)
returns (string memory)
{
return super.tokenURI(tokenId);
}
- After we write all the code defined above, we should be ready to compile and deploy the NFT smart contract in Rinkerby Test Network.
In order to do this we are going to use Remix and Metamask.
The next steps will be available in our next article, so be sure not to miss it.
Until next time.
 Co-Founder & CEO @ Inmind - Blockchain & Mobile Expert | DAO / Tokenization / Web3 | CTO @ Brainstems (Former TIEX) | Board Member @ CUTI